OPERATING MANUAL
ELITE MODEL 92 CNC
CNC automatic grinding machine for universal tool sharpening
Read these instructions carefully before using the machine. Make sure that these are understood by all operators in contact with the machine before it is put into service. We do not assume any responsibility for damages or breakdowns caused by incorrect following or ignorance of these instructions.
For any questions please contact us directly or through your sales representative.
In order to attend to your query we will need the machine number.
These instructions can be modified due to technical modifications for the improvement of the machine.
INDEX
- TRANSPORT AND ASSEMBLY
- ASSEMBLY SITE REQUIREMENTS
- TECHNICAL DATA OF THE MACHINE
- SECURITY PROVISIONS
- START UP
- INSTRUCTIONS FOR OPERATING THE MACHINE
- MAINTENANCE
- ACCESSORIES
TRANSPORT AND ASSEMBLY
The machine is delivered properly packed with a wooden cage. During all transport, it must be kept in its original vertical position.
During transfers, only loading systems (forklift, pallet truck, etc.) that have sufficient capacity to lift and move the machine should be used. No person must be positioned under the packaging or in the place of maneuver.
IMPORTANT: Support the machine only by the pallet base, the side walls or the ceiling are not designed to support the machine, never use them to lift / load the machine.
When leaving the machine on the floor, avoid shaking or dropping the machine.
IMPORTANT: When receiving the machine, make sure that it has not suffered any damage during transport. If you notice a blow to the packaging or machine, you must write it down on the carrier's delivery note and send us a copy of this delivery note along with the photographs of the damages appreciated. Failure to make this entry may incur in the rejection of damages.
If the machine is not assembled once it has been received, it should be kept in a dry place, free from humidity and direct sunlight.
Use caution when removing the machine from the packaging. The machine is bolted to the base of the packaging. The moving parts, such as the vertical column, are supported for transport, it is necessary to unblock these parts before putting the machine into service, to avoid any damage to the shafts.
MOUNTING LOCATION REQUIREMENTS
The mounting location must be clean and dry. The mounting base must support the weight of the machine according to the applicable local regulations, and must be free from vibrations from other machines.
The necessary free space must be available to be able to operate the machine as well as to guarantee access to doors and covers to carry out maintenance and repair work.
Pay particular attention that the ventilation grills do not receive dust or chips from other machines.
TECHNICAL DATA OF THE MACHINE
CNC grinding machine with 1, 2, 3 or 4 controlled axes.
- Grinding wheel motor: Electrospindle driven by frequency variator. Programmable operating speed adjustable from 3,000 RPM to 9,000 RPM (Optional up to 18,000 RPM) in 100 RPM increments.
Engine power: 1.5 CV.
- Grind holder: On cone ER20.
- External diameter of the grinding wheel: Up to 150 mm.
- Diameter of the hole of the grinding wheel: 20 mm. or 32 mm. According to chosen grind holder.
- Diameter of the axis of the abrasive pins: 6 mm.
- Dimensions of the work table (X axis): 730 x 210 mm.
- Maximum weight on the work table: 100 Kg.
- X axis travel: 450 mm.
- Y axis travel: 170 mm.
- Z axis travel: 250 mm.
- Vertical orientation of the grinding wheel motor: 360º
- Horizontal orientation of the grinding wheel motor: 90º
- Refrigeration equipment with a 40 l / min pump. 1.5 Bar.
- Total connected power: 5 kW
- Electrical connection: 400V 3Ph + N 50Hz - 220V 3Ph 60Hz.
- Dimensions of the machine:
- Version with half cabin: 1600 x 1150 x 1500 mm.
- Version with full cabin: 1600 x 1150 x 2100 mm.
Net weight:
- Version with half cabin: 640 Kg.
- Version with full cabin: 670 Kg.
SECURITY PROVISIONS
SAFETY REGULATIONS
Observe and carefully apply the following safety rules, not respecting these rules can cause personal injury or damage to the machine itself.
The installation and maintenance of the machine described in this manual must only be carried out by operators who know how to operate it and have sufficient technical knowledge.
The Elite 92 sharpener has been designed for sharpening tools, any other use other than that for which the machine was designed will automatically void the warranty.
Risks
In order to be able to work in maximum safety conditions, in order to avoid the creation of dangerous situations, a compilation is made of the rules of conduct that the operator must follow to avoid accidents.
Risks "USE OF THE MACHINE"
If for any reason it is necessary to stop the machine urgently, press the red emergency button, located on the control panel.
It is absolutely forbidden, during the operation of the machine, to remove the protections placed by the manufacturer to safeguard the safety of the operator.
The use of the machine is allowed only to qualified personnel.
Do not leave the machine in operation unattended.
To use the machine always wear:
- Safety gloves
- Security shoes
- Security clothes
- Safety glasses
- Hearing protection
These warnings do not include all the possible risks that improper use of the machine could entail. Therefore, the operator must proceed with prudence and observing the rules.
USE AND CONSERVATION OF THE INSTRUCTION MANUAL
This instruction manual must be read and understood by all personnel who come into contact with the machine.
This manual is for:
Indicate the correct way to use the machine according to the type of work to be carried out.
Provide the necessary instructions for the transport, adjustment and maintenance of the machine.
Facilitate the ordering of spare parts and information on risks.
Limits of use of the manual
The machine is intended for professional use and therefore the experience of the operator is required and of vital importance.
Importance and conservation of the manual
This manual is to be considered part of the machine and therefore must be attached to it until the end of its use.
Additional information and clarifications:
The user, owner or maintenance person can contact the manufacturer to request any additional information on the use of the machine and possible maintenance and repair intervention procedures.
Liability expiration
The manufacturer is considered exempt from eventual responsibilities in the event of:
- Improper use of the machine
- Use of the machine by untrained persons
- Serious faults in planned maintenance
- Unauthorized interventions or modifications
- Use of non-original spare parts.
START UP
Once the machine is located in your workplace, you must remove the protections placed for transport as well as the anti-corrosion protective grease.
If refrigeration equipment is included, it must be filled with water + coolant in the appropriate proportion according to the manufacturer of the coolant and the hardness of the water. The water used must be potable water with a recommended hardness between 10º to 20º.
For the electrical connection you must contact a qualified technical installer according to the current regulations of the country.
CHECK THE DIRECTION OF ROTATION OF THE MOTOR
To check the correct connection of the electrical phases, start the motor of the cooling pump and observe the direction of rotation of the shaft, it must coincide with the direction of rotation marked on the pump. If they do not coincide, reverse two of the phases in the machine connection input or in the electrical outlet of your installation.
INSTRUCTIONS FOR OPERATING THE MACHINE
FIRST COMMISSIONING
Turn on the machine by placing the ignition switch lever in the ON position. Releases the emergency stop if it is activated.
The LCD screen will turn on displaying a check message. Once the check is finished, the axis referencing message will be displayed.
IMPORTANT: You must check that no axis will collide with a tool or person.
Before referencing, you are allowed to move the axes with the movement buttons, to release, for example, the possible collision with a tool already mounted.
The order of referencing the axes is as follows: Z, Y, X. When you finish referencing an axis, it stays in its position and starts referencing the next axis.
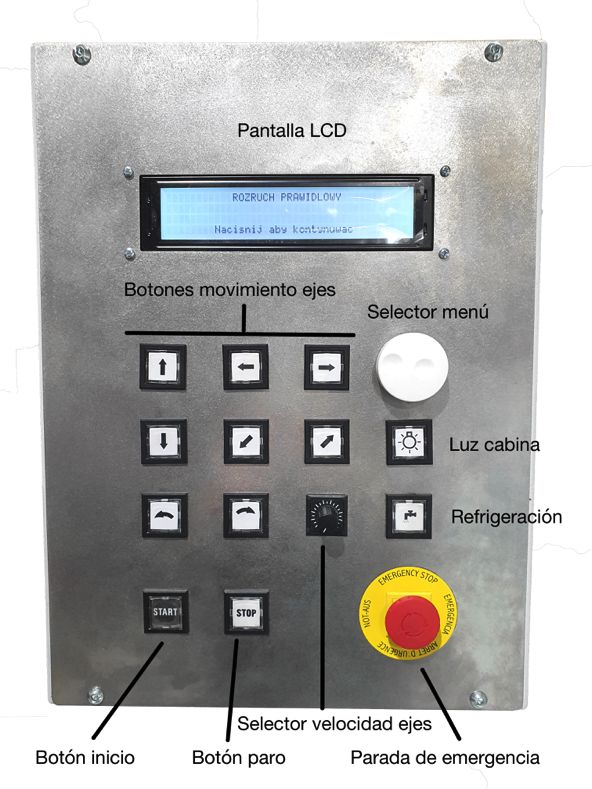
CONTROL OPERATION
The arrow keys: Up, Down, Depth, Height and Rotation, are used to move the corresponding axes (depending on the automated axes of the machine you have purchased). The regulation of the speed of the movement is carried out by means of the axis speed selector. NOTE: You must first adjust the speed with the selector, and then move the shaft. The speed selection while the axis is already in motion will be ignored.
Turning the light and cooling on and off is done manually using the button designated for that function.
The START and STOP buttons are used to confirm / cancel automatic movements.
IMPORTANT: The STOP button is not an emergency stop: When the STOP button is activated the machine will stop the automatic work cycle when it is in a safe position (for example when it has moved away from the cutting tool edge) to avoid collisions.
If the machine is needed immediately, the EMERGENCY STOP button must be used.
The menu selector allows you to navigate through the menu that appears on the LCD screen, as well as to edit the program values.
After homing, you can move the machine with the axis direction buttons.
IMPORTANT: Before referencing, the machine does not know its current position, so operating the axis movement buttons could cause a collision due to excess travel of the driven axis.
To run a sharpening program, select one of the programs from the menu. You can store up to 20 programs (from No. 1 to 20). The editable options can be seen below:
- Roughing: Amount to sharpen. The first value corresponds to the total amount. The second is the partial amount of sharpening to apply for each pass of the wheel. The V value corresponds to the working speed, so that 100% corresponds to 100% of the value selected in the axis speed selector. For example, a value of 50% will correspond to 50% of the value selected in the axis speed selector.
- Lapping: These are the passes that will be carried out without applying load (polishing or finishing passes). The% V value corresponds to the value selected in the axis speed selector.
- Nr. Of teeth: The total of teeth that the tool has. The machine will carry out an exact division according to the number of teeth, so that if 4 teeth are indicated it will carry out divisions of 0º, 90º, 180º and 270º.
- Tooth orientation: position of the tooth depending on the tooth. Front: Tooth facing towards the grinding wheel. Rear: Tooth looking against the grinding wheel.
- Operating mode: Tooth per cycle: It carries out all the passes on the current tooth and once it is finished it continues with the next tooth. Cycle pass: Performs one pass on the current tooth, then proceeds to the next tooth: Useful when the number of teeth is so large that the wear on the grinding wheel between the first and last tooth is significant.
- Head position: Place where the dividing head is located: Left or right, depending on the point of view of the machine operator.
- Direction of rotation of the dividing head: Direction of rotation of advance of the dividing head when it passes to the next tooth.
On the next screen you can set the direction of rotation of the grinding wheel as well as the speed of rotation.
IMPORTANT: Never rotate the grinding wheel faster than the manufacturer's recommended speed. It could cause breakage, wheel loosening as well as damage to operators and personnel.
Once the program is created, click on the SAVE button. Now you can transmit the program to the control using the START button. You will be warned that the grinding wheel will begin to rotate.
IMPORTANT: You must ensure that neither you nor any dangerous part is in contact with the grinding wheel.
If you press the START button now, the grinding wheel will start to rotate. Now you must place the grinding wheel in contact with the piece to be sharpened. Once the grinding wheel is rubbing against the piece to be sharpened and you have verified that the sharpening path is correct (do not hit any part of the machine or tool), you can press the START button again to start the automatic work program.
IMPORTANT: Using the axis speed selector, you can adjust the speed of movement of the axes to position the tool.
IMPORTANT: Once the machine is running the automatic sharpening program, you can adjust the sharpening speed using the axes speed selector. The selected speed will take effect once the movement has reached an extreme, never in the middle of the movement.
STOP button
IMPORTANT: The STOP button will never stop the machine suddenly, to stop the machine quickly you must press the emergency button. The STOP button will give the instruction to stop the sharpening program and the machine will stop once the sharpening movement has finished and is at the beginning of the sharpening pass, to stop safely and without making marks on the sharpened piece .
MAINTENANCE
To clean the machine, never use compressed air: it will embed the dirt inside the guides and bearings. To do this, clean dirty surfaces on a regular basis, and operate the machine's greaser at least once a week.
Remove the coolant if the machine is not going to be used for more than 1 week to avoid the growth of bacteria.
In the case of anticipating prolonged stops, you must protect the surfaces that are not painted (guides, table, column, etc.) with an anti-corrosion agent. This anti-corrosion agent must be removed before restarting the machine.
In the case of damaged parts, we recommend that you always use original parts. We are not responsible for failures caused directly or indirectly by the use of parts that are not suitable or intended for the use of the machine.
ACCESSORIES
You can obtain a list of recommended original accessories by contacting us directly or through your official distributor.
Version: 02/2021